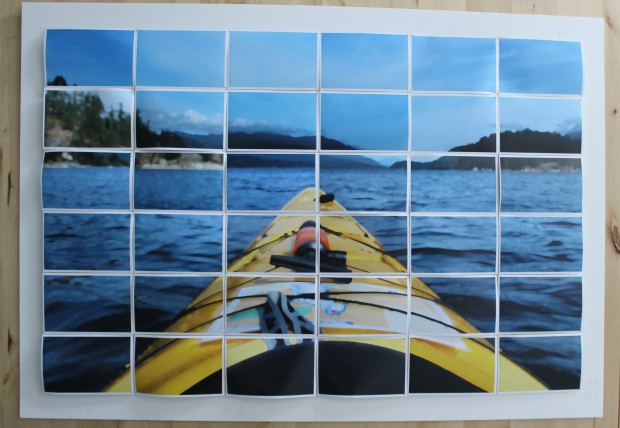
I’ve always struggled with how to fill large walls, and I swear that how all the walls in our house are…large and empty! I have a gallery wall going in the entry, but unfortunately there can only be so many gallery walls in one house. Enlarged photographs are a great way to go, but I wanted something with a little more interest. So here is what I came up with!
I started with a photograph that I loved. This was taken when Jesse and I drove up the Sunshine Coast of British Columbia, and spent an afternoon kayaking up the inlet. I opened the photograph in photoshop and used filters to give it a slightly blurred effect. It’s kind of subtle from a distance, but can definitely be seen up close. I then enlarged the image to 36×24 inches, then used the rulers to divide it into 6×4 inch sections. Then I took each section, copied, and saved as an individual file, so in the end I had 36 files to print as 6×4 inch prints. Sorting them into order was kind of fun, a little puzzle.
Once they were all laid out, I got my large piece of foam core. The best way to do it would be to cut the foam core down to fit the frame first. I did it last…should have done it first. I’m using a large IKEA Ribba Frame. Using pencil, I drew a grid on the foam core to make sure that each picture was straight, and then I worked my way out from the center. Each photograph I pinned into the foam core at each of the 4 corners. I didn’t push the pins in all the way as to not damage the table.
 Once all the photographs were pinned to the foam core, I held it up vertical and pushed them all the way. Then I turned the foam core upside down on the table with all the pins stuck out the back. I didn’t want all the photographs sticking out too far, so using piers, I clipped the pins down about a 1/2 inch.
Once they were all clipped down, I held it upright again and pushed the pins from the back so that the clipped ends were flush with the backside, and the photographs were sticking up about 1/4 inch off of the foam core. Each height was ever so slightly different, but that gave it a nice dimension that I was going for. 
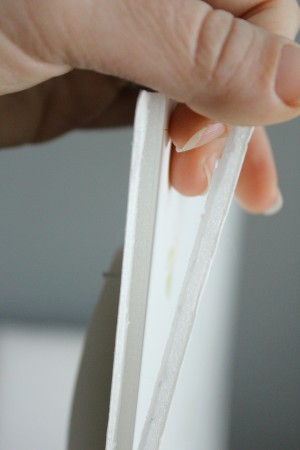
The form core that I used was 1/4 inch thick, which would never fit into the frame, or at least between the frame and the little frame clips that hold it in place. I had to thin the outer edges about 1/4 inch by carefully running an exacto knife around the backside 1/4 inch from the edge making sure to only cut through the back paper layer and the foam – not the whole thing. Then from the sides, I ran the exacto knife between the top paper layer and the foam. It felt like the game of operation…such precision!
 Then I carefully pried off the back section, so the edges were only paper thin.
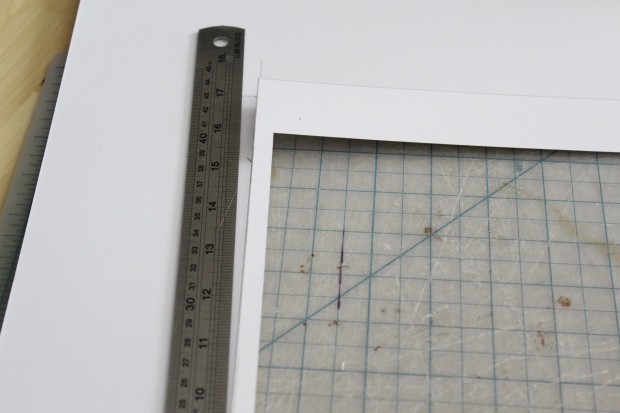
 Next step was cutting the inside matte dimensions to match the dimensions around the photographs.
Notice how wide the matte borders are? Yeah, I completely cut it wrong. I measured correctly, but laid it out very poorly. Luckily I didn’t cut enough out, so it was easy to cut out a little more..to make it fit correctly!
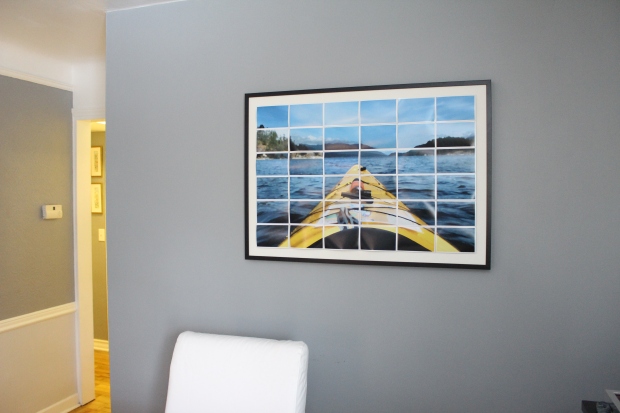
Because the photographs are raised, it eliminated the need for the (plexi) glass front. So the matte went in, then the foam core.
Once all the tabs were folded over, it was time to hang!


You just gave me an idea what to put on my bedroom wall. This is lovely!
What an AMAZING idea — love this!
Just wish I had the dexterity/creativity to be able to execute such a cool idea. I’m a freelance writer, so the visual medium totally perplexes me…
:)
Very effective – and a great idea, too. Not so sure I would have the patience, nor the skill to carry it out though!
Love this! What a clever idea. I agree that you can only do so many gallery walls. I have a blank wall I’ve been trying to fill.. I think I know what I’ll do now! Great blog. Thanks for sharing!
I am with Jeanette! I love this idea and display my own photograny in my home. My husbnad and I were just talking about some new shots for our walls, as the ones we have up now are about ten years old. I love that you had to improvise on making the board fit the frame, and showed how you did it. Great Job!!! Thanks for sharing!!! :) AmberLena
Aww!
I love the effect that this creates.
nice idea!!
it looks good …
and you have given a good description of the complete process
enjoyed reading your post
Great idea as I like the look. Thank you.
I LOVE this idea! I had done that with a glass covered coffee table once! So fun!
How incredibly smart!
very cool. so the pictures were left to bow out a little? – tom
Yeah, I kind of liked the dimension it gave each photo so they definitely looked individual!
Really great post! I am definitely working on this project this weekend. Thanks for the inspiration! Stop by and say hi, http://saltpepperbrilliant.wordpress.com/
This is awesome!! I always love making photo art!-
I LOVE this!!! I’m definitely going to try this, thank you so much for sharing your photo creativity! And I love that photo you took!
great work of art. kudos :)
I like doing that! I like to take smaller pictures so that the pixels look huge too, well, it depends on the picture!
Your picture(s) looks really nice.
Thanks for sharing, looks like a fun project!
Very cool. Well done!
That is really cool. You have given me a great idea of what to do with a picture I took while camping at Lake Superior. Thx.
That’s such a great idea! Thanks for sharing and giving me inspiration :)
This is great! I only wonder if I could get them all straight though. I have so many pictures I would love to hang, but like you, I need to find a better way to fill big spaces! Thanks!
This is such a fantastic idea!
Cool! I’ll have to try doing this sometime…
What a great way to fill in a large wall and to have a memory of the day every time you look at it. I will definitely try something like this in the future.
Great idea! Make sure you put it on pinterest.com
Good Call! Thanks!
Very creative idea there. I really like the result!
groovy!!!!
What a fabulous idea! I will have to try it for sure.
Nice job. I have done something similar by breaking up a photograph into 9 larger squares to make a full image when put together, but I had it professionally framed. Your post has inspired me to try framing my next one myself.
Graphic Jedi
wow so awesome
Fabulous! I love the simplicity of the idea. Take a photo you love and just break it up. Then it becomes something more. Thank you for posting!
Really great idea. I am always intrigued by unique ways to display photos.
Another incredible thing to look at when we’re over at your house. Love the picture you chose and such a great idea! You continue to amaze me with your creativity!
I love the Idea, and am considering doing this myself…however I’ll probably take a few shortcuts hahaha.
I absolutely love this! It is definitely something I will have to try! Thanks for the great idea!
Reblogged this on delightfully teal and commented:
I absolutely love this idea for a big picture to take up a big space! I’m not sure we have a space for it right now but I know we will eventually. And maybe I’ll have to move some things around just to fit something like this up.
excellent idea, and I love how it’s personalised too!
Reblogged this on B.Real Magazine.
Great concept, love the finished product. I need more ideas like this for my DIY, Health & Green living magazine, which is publishing in Middle Tennessee. Check it out http://www.brealmagazine.com.
This is really nice! I like the fresh take on just enlarging and framing a photograph. I’ll do it!
Wow looks great, think I would find it a bit tricky though!
Very creative. Thanks for sharing.
I will deff give this a shot with one of my favorite photos.
Nice!!
Thanks for such a great idea! I’ve been trying to figure out what to put on the wall above my bed, and I think this is perfect. I wanted a painting, but I don’t paint and paintings are expensive! My husband takes great photos, so I think we can transform one into our own work of art with this idea.
I love this idea! Great choice of photo – I can see this being rather creepy if you’d used a portrait.
such a great idea! I love it…..thank you for sharing
Wow, I love this! We went to the Rocky Mountains last fall and this would be a really fun project with one of those photos. Thanks!
Reblogged this on 88pianokeys and commented:
Idea for studio wall
This is awesome! Thanks for the idea!
It’s so simple, but brilliant. Much better than enlarging one print.
this is such a cool idea! i just moved into an apartment in NYC with huge white walls and wanted to do something fun and different. I saw the crayon art where you melt crayons with a blow dryer. That and now this will be covering my white walls :) thanks again for the great idea!!!
This is such a neat idea. I love how it is so simple of an idea but creates such a unique effect. I like how its a ways to highlight a favorite photo without just having it framed. I was a little confused when you talked about the matte frame being the wrong size and was wondering if you could explain that part a little more.
This is wonderful maam, I appreciate the simple ingenuity that you shared. Hands down excited to see some more of your stuff! – Dirk
Reblogged this on 22 Yellows – A Collection of Sunshine and commented:
I am going to try this with a pic of my son :)
I have a friend here in Korea who did the same thing; it’s some amazing stuff.
Nice! Love the photo to begin with – but cool technique for great effect.
Great idea and an effective way to print large without a large printer. In 1995 I bought a photo from a famous photographer — Joel Meyerowtiz. It was very large — about 3 feet by 4 feet. It was a digital print of a street photo taken in the 1970s that Joel had scanned and tiled as you did. He printed 8 by 10 sections and taped them together. The look is that of a single large photo. Joel told me that he had “mastered Photoshop” and was experimenting with digital photography and processing. He has recently said that back then he wanted to go large but was in Provincetown without a large format printer. In fact in 1995 almost no one had a printer large enough. Here is a link to my blog post about Joel and buying the print from him. http://frankwinters.wordpress.com/category/joel-meyerowitz/
Very cool, Emily. The print looks fantastic on your wall!
Nice idea, reminds me of Mike Matas’ Life Poster.
What a great idea!
creative ! love it !
And here I am for the 2nd time
looking at this post again!
Full of passion and patience (honestly). Really makes me wanna try it too soonest! Nice impressive job :)
theothertuesday
wow! amazing.. gonna try and give it a go for H2B bday this year, you can never have enough art on the walls :) thanks for sharing
This is lovely! I’m going to try it! :D
great idea!!! must try this!!!
This is a wonderful idea! I can’t wait to do this with some of my travel photos.
Reblogged this on Things to Cherish and commented:
Fun DIY project from Better Remade!
I love this idea! I will definitely have to do that in the future for photo displays
Thankyou so much, I’ve been wanting to do this for quite a while now but haven’t had the motivation and now you have made it sound so simple.
I love it! I`m going to try this myself.
Reblogged this on Joakim Knudsen and commented:
A creative way to show off you photos
That is Awesome! I have enough gallery walls in my house also. Maybe i’ll try this next!
I absolutely love this idea! This is something I would never think of! I think I might take one of my Maine sunset pics and do this with it! Thanks so much for sharing!
I did a less-complicated version of this project – I used glue dots on the corners of the photos instead of the pins – and it turned out fantastically! I wish I could post the photo for you here, but I’m going to put it up in my blog. Thanks for the great idea!